Showing posts with label cooking. Show all posts

Monday, August 2, 2021

Spices & Seasonings Part II

This Spices & Seasonings post is 2+ years in the making. I kept pushing it off because I wanted to catch up on the skincare and makeup (what makeup?) posts. But alas, I won't ever catch up so here's this post, finally ^.^"

For the past couple of years, I've been obsessed with this Yuzu Marmalade from Yakami Orchard. So, so, sooo good and not too sweet. That crisp yuzu fragrance and taste is just addicting. It pretty much replaced all other jams and preserves for me even if I'm the only one in the family who eats it (hubby and the boys still prefer raspberry and strawberry jams). It's just delicious on buttered toasts, to sweeten teas, and even on pizza crusts ^.^ There are 2 sizes available, a smaller 300g jar which lasts me about 1-2 weeks, so now I only buy the big 580g jar which lasts a good deal longer. Oh, did I mention it's available through Amazon? Yeah. That makes it super easy. I usually buy 2-3 big jars at a time. 

This is the smaller 300g jar next to Momoya Chili Oil with Fried Garlic.

Wednesday, April 22, 2020

Household Goodies

Long post ahead with lots of photos. First Household Goodies post to share some neat stuff I found over the past couple of years, since hubby and I moved into our permanent home.

***Disclaimer: I'm *not affiliated* with any of these brands or vendors. Just sharing the goodies I enjoy is all.

I'd mentioned Heartfelt SF in my latest Tea Time post, an SF locally owned gift shop our friends N. and A. introduced us to where I source my most favorite Earl Grey Lavender tea ever. Turns out they have a bunch of great kitchen stuff too. One time I was browsing their online shop and found these two adorable sets of pinch bowls and couldn't resist.


Look how cute these are! Hubby and I have found ourselves reaching for them constantly, to put our tea bag, to rest our tea spoon, dipping sauces, etc.

Monday, December 30, 2019

Spices & Seasonings

First Spices & Seasonings post, folks, and a long one too!

Over the years I realized I've written a few things scattered here and there that really should all belong in this same post. Hubby and I love food, and before our little guy came along I used to cook a lot more than I do now. That meant spices, seasonings, and condiments galore. Here they are, some of my favorite things to share with you.

First up, a few of my most loved Japanese condiments. Don't get me wrong, I love a great many condiments, but I have a special soft spot for the Japanese variety since hubby and I have lived in Japan a few times and are accustomed to Japanese food.

When we were still living in Yokoyama (2010-2012), I saw this Momoya seasoned chili oil on TV one day and just had to run out to the grocery store to get it. Japanese food shows almost always make me hungry because folks just squeals and shrieks with pleasure as they chow down whatever that was presented. This chili oil has the funniest name: 辛そうで辛くない少し辛いラー油 (karaso de karakunai sukoshi karai rayu), which roughly translates to, "Looks-spicy-but-not-really-spicy Mildly Spicy Chili Oil" LOL! Its English name is much more boring: Chili Oil with Fried Garlic.
***Stock photo courtesy of Momoya JP.

Thursday, March 8, 2012

Chicken Fajita

Hubby was craving Tex-Mex, but after our last failed attempt at getting something reminiscent of Mexican food, I thought I might as well just throw something together and hope it works. It sort of did, and we didn't have to pay an arm and a leg for it ^.^


Here's to the most half-assed thrown together Chicken Fajita ever (mostly due to a lack of ingredients, only a small portion is my laziness), and it wasn't that bad :P

Saturday, February 4, 2012

Cook Book Party

Saturday afternoon hubby and I attended a small and intimate book event for a soon to be released cook book titled Kibo at the author's Tokyo home. It was just a nice way of sampling a few of the recipes in the book and to hear the author talks about it in person. Kibo contains traditional recipes from the Tohoku region, or more specifically Iwate, Miyagi, and Fukushima, the 3 prefectures that were most severely affect by the March 11 Tohoku Earthquake and Tsunami as well as the nuclear crisis that followed. It's a tribute of sorts to the food culture of the region as well as to its residents who have seen been displaced. 

Tuesday, November 15, 2011

Katsu-don

Since coming to Japan last August, hubby and I have resisted our urge to indulge in anything to do with tonkatsu, a deep fried pork cutlet that's super common and popular. The reason is simple - it's really very fatty! Think a patty of pork with a layer of fat, breaded and deep fried. Eeps!!!

And then we paid another visit to Mrs. H., mum-in-law's college roommate who lives in Zushi, and she insisted on sending us home with a gigantic patty of tonkatsu -.-' We couldn't refused of course, and I ended up making katsu-don instead of eating the tonkatsu with just sauce and shredded cabbage. Urgh.

If you're wondering how the katsu-don fared, well, ...it was damn good ^.^ And to be honest, that's the bigger reason why hubby and I avoided eating it for so long, because once you start, you can't stop. Despite all our efforts in staying far away from this stuff since last year, we finally broke down and have since bought a few ready-made tonkatsu to make katsudon again (and again). Sigh...

Monday, August 1, 2011

Nira Niku (Pork and Garlic Chives)

My neighborhood Chinese restaurant makes this dish called Nira Niku (Pork and Chinese Chives) that's so simple yet delicious, and after ordering it several times I was determined to try and make it at home. It took me a few times to get it just right, but the result was pretty close to what they served at the restaurant.


Wednesday, July 20, 2011

Three Cup Chicken (三杯雞)

When I found pictures for my Black Pork (東坡肉) post from Almost Bourdain, I decided to look through it for more yummy things to try and stumbled upon this Three Cup Chicken (三杯雞). The recipe looks so simple and I've been craving for Chinese food so...

Since I used the Three Cup Chicken recipe from Almost Bourdain, I won't post it again here.

The result was yummy, though I put in one too many chile peppers so hubby and I were half crying while we ate it LOL!


And turns out, it tasted just like a different recipe for Shanghai Basil Chicken that I replicated from a Chinese restaurant in Denver. We visited the restaurant only once but the dish was so delicious I was hell bent on replicating it at home. The restaurant recipe calls for the chicken thigh meat with bones in and is on the sweeter side, but the 2 dishes taste very similar nonetheless.

Sunday, July 10, 2011

Black Pork

After having had the most unbelievable Black Pork at Arisan last month, I was determined to learn how to make it myself. After all, it is the Chinese cousin of the Vietnamese Caramelized Pork (Thịt Kho, and I know the first link will take you to the Caramelized Tofu & Eggs recipe, but I also made a pork version). There's a Japanese cousin too, called Nihon ni Buta (日本煮豚), or Japanese Simmered Pork, which I've had at a Japanese get together but didn't like as much.


Nihon ni Buta


But oh heck, I tried making them both just for the hell of it. Citrine had kindly sent me a couple of Youtube links to cooking videos for the Chinese version called Dongpo Rou (東坡肉, see them here and here, both are in Mandarin), and hubby helped me dug out the Japanese Nihon ni Buta recipe from Cookpad. You can also see drool-worthy pictures of Dongpo Rou from Almost Bourdain, and the blog author also has much better pictures the Vietnamese Caramelized Pork too by the way! Since the recipe for Dongpo Rou is already aplenty from both the Youtube links as well as the blog link, I won't list again what I used. The Nihon ni Buta recipe is similar, only a whole lot simpler than Dongpo Rou ^.^

Saturday, July 2, 2011

Sundubu Jjigae

There's a Tokyo Sundupu shop near hubby's school, and we have eaten there several times since they have a pretty decent lunch deal (sorry...the stuff's so yummy it always gets wolfed down before any pictures are taken, may be next time ^.^).

I love Korean food, and sundubu jjigae is probably one of my most favorite Korean cuisine discoveries. It is a seafood stew with silken/soft tofu and vegetables, and it is surprisingly easy to make. The Sundubu Jjigae recipe below is a combination of what I found on the internet blended with what I ate at Tokyo Sundupu.


Wednesday, May 18, 2011

Gai Pad Prik Pao (Thai Chicken in Chili Paste)

Gai Pad Prik Pao is hubby's favorite dish and he likes it so much I make it pretty much every other week ^.^ It's a really simple but delicious Thai dish that doesn't involve an array of exotic seasoning ingredients. Usually, when I make this dish, I a whole big pot so we can pack bentos and still have some left over for brunch the next day. What, Thai food for brunch? Oh hell yes, a small portion of rice top with this stuff and a sunny side up egg is a damn good (and filling) brunch!

This was dinner though :)

Wednesday, April 6, 2011

Shrimp Scampi

Was trying to get back into the roll of things and, well, started craving Italian food. Gosh I miss Jersey. So what do I do but looked up the recipe on the internet and try to make it myself! I had pasta, a couple of tomatoes, and shrimps. Google turned up Shrimp Scampi and I thought, damn, that sounds really hard to make!

It turns out this dish's surprisingly easy to make! I couldn't believe it at first but after making it (and try eating it), I literally squealed because now I know how to make Shrimp Scampi! ^.^ Here's the recipe of Shrimp Scampi I tried.


I threw in the crab legs I had too ^.^


Monday, February 28, 2011

Thịt Kho Dưa Giá

Happy March!

...Though it doesn't change the fact that I'm still waaaaaay behind on my posts. In fact, it makes it worse that it's already March and I'm still posting about a small meal I made for Lunar New Year :X


Thursday, February 10, 2011

Bún Riêu

Bún Riêu is a delicious Southern Vietnamese rice vermicelli soup in a seafood-tomatoes broth that, well, started out complicated go make but the process has been simplified over time (thank goodness!) ^.^ It used to be that the dish is made from fresh crabs, but nowadays my mum and I are among the vast majority of those who use a shrimp or crab paste sold in cans or jars :P It just really makes life so much easier and the dish much more accessible. I can make it for dinner at will instead of having to plan far ahead for some ceremonious special occasion like my Martha-Steward-esque aunt once did.


The bún riêu pictured was made with shrimp paste because crab paste is not available here in Japan and to be honest, the shrimp paste I used wasn't any where as good as Por Kwan Spicy Crab Paste T.T Also, there wasn't any "Vietnamese ham/sausage," Thai basil, and a host of other things, so the bún riêu I made was actually quite plain... :(


Wednesday, February 9, 2011

Nikujaga

Nikujaga is usually a less-soupy beef and potatoes (though mostly potatoes) stew that's claimed to be one of Japan's comfort foods. I think I understand. It's yummy and especially so when eaten in the colder season.

People have different ways of making nikujaga, and I've arrived at this rather simple recipe after gathering my sources from various websites.


Sunday, December 12, 2010

Char Siu Chicken

Had a fairly delicious and super easy dinner made using this Lee Kum Kee brand Char Siu Sauce. If you go a Chinese restaurant and see slices of pork being served up coated in a plummy red sauce, that's char siu, or Chinese BBQ.

***Picture from Lee Kum Kee USA.

Normally when I make char siu at home, I use the Char Siu Seasoning package from Noh brand and using pork exclusively. The problem with that is the pork would have to be either grilled or at least broiled in an oven. I have neither, and my toaster oven is not, umm, sufficient or even hot enough to cook meat. Pan frying sounds too greasy for pork, so I used this ready made Lee Kum Kee char siu in a jar and chicken instead ^.^

***Picture from Noh Foods, Inc.

But really I have to credit this Vietnamese cooking blog for giving me the idea of using this Lee Kum Kee ready made char siu sauce with chicken. It wasn't clear to me whether blogger grilled broiled her chicken, but it was clear this sauce yielded yummy results. So I tried it at home ^.^ although via pan frying and not grilling or broiling. There's no need for a recipe, just marinade chicken or pork with a generous coating of this ready made sauce for at least 30 minutes before grilling, broiling, or pan frying! I told you it was super easy! xD

Monday, November 29, 2010

Chè Chuối Chưng - Vietnamese Banana Tapioca Coconut Pudding

So what the heck did hubby and I searched high and low for in Chinatown instead of Black Friday shopping? Ingredients to make this Vietnamese Banana Tapioca Coconut Pudding (chè chuối chưng)!

The traditional recipe for this pudding calls for a few ingredients that aren't available here in Japan, like the chubby and short (about half the length of a regular banana) but very fragrant banana that's only available in Southeast Asia (chuối sứ, it's actually not readily available in the US either, and when it does, it's expensive as hell!), and yuca roots. So I had to make do with just regular bananas and forgo the yuca. Oh well, it still turned out pretty well, and by well I mean delicious! It's a very heart warming dessert, perfect for the cold weather.

The recipe I used is actually very simple. And I made this pudding using my rice cooker, so it's super convenient too.

Here's my recipe for Chè Chuối Chưng.

Ingredients: makes 6+ servings
- Bananas, 5-6 medium, peeled and quartered
- Tapioca, as much or as little as desired
- Coconut milk, 1/2 a can. I made the pudding pictured below with (and prefer) Chaokoh brand, but any brand will work.
- Peanuts, crushed, half a teaspoon per serving (or more if you like peanuts), for garnish
- Optional: a couple of sprinkles of roasted sesame per serving, for garnish

Seasonings:
- Cane sugar, 5-6 teaspoons, or to taste
- Salt, 1/2 teaspoon

Steps:
- In the rice cooker, dissolve the salt in hot water, just enough to submerge the quartered bananas in. Soak for about 15 minutes.
- Cook the bananas in the salt water using the porridge setting (slow cook, takes about 1 hour).
- Mean while, boil water in a separate and cook the tapioca until almost transparent, then remove and set aside.
- About 30 minutes into cooking the bananas, add the tapioca into the rice cooker, mix in the sugar and stir gently as to not break the banana chunks. Make sure the tapioca is submerged in the water along with the bananas, add more water if needs be, but only enough to submerge the contents. Let cook for another 20 minutes.
- About 10 minutes before it's done cooking, gently stir in the coconut milk and mix well. Let finish cooking.
- Serve hot with crushed peanuts and a few sprinkles of roasted sesame. Enjoy!

I was too lazy to crush the peanuts, so I just left them whole ^.^

Friday, November 26, 2010

Pad Thai

Let's just say no one can say they've had Thai food without ever trying Pad Thai. The dish differs slightly here and there, but ultimately some of the key ingredients/garnishings show up inevitably in every version out there, namely bean sprouts, garlic chives (韮菜, nira, hẹ), shrimps, tofu, eggs, lime, crushed peanuts, and the Pad Thai sauce itself!

Pad Thai from Thai Avenue, Boulder, Colorado.

There are 2 ways to make Pad Thai:
1. The traditional way, making the sauce from scratch, then using the sauce to make the dish. This traditional way is a bit tough, of course, because there will be hard to find ingredients. I found the recipe for this Pad Thai sauce from www.importfood.com.
2. The quick way, using a ready-made Pad Thai sauce. Super duper easy and fast since you don't have to bother with the sauce at all!

Here's the recipe to make Pad Thai sauce from scratch.

Seasonings: per 2 servings of Pad Thai
- Palm sugar (đường thốc nốc), 2 heaping Tablespoons
- Thai fish sauce (preferably Squid brand), 4 Tablespoons
- Tamarind concentrate, 2 Tablespoons
- Thai Sriracha sauce (preferably Shark brand, mild or strong if you want your Pad Thai spicy),
***Picture from www.importfood.com.

***Picture from Thai Food & Travel.

Steps:
- Simmer palm sugar, fish sauce, Srichara sauce, and tamarind concentrate together until sugar are all melted and sauce thickens. Set aside to use or refrigerate up to 1 week.

Ready made Pad Thai sauce. So far I've only tried Mae Ploy brand and it wasn't too bad.
***Picture from Amazon.com.

Here are what I used to make Pad Thai. Again I am not claiming this to be my recipe, because it's not.

Ingredients: per 2 servings of Pad Thai
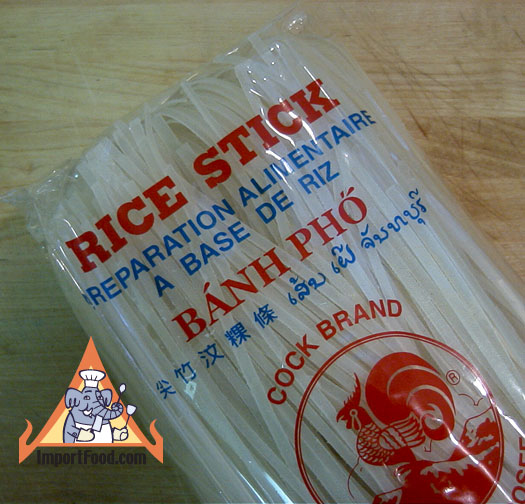
- Rice noodles sticks, or rice sticks, or better known as dry Pho noodles, any brand will work but note the noodles must be flat and not rounded, 1/3 pack, medium width.
- Eggs, 2 medium (1 per serving)
- Shrimps, small or medium, peeled and deveined, as many as desired, dunk in boiling water but do not cook
- Fried tofu, sliced into strips, a small handful per serving
- Bean sprouts, rinsed well, a handful per serving
- Garlic chives, washed and cut into 2-inch lengths, as much as desired
- Fresh shallots, sliced. If fresh is not available, fried shallots is a good substitute.
- Optional: salted/pickled radish, rinse and squeeze to drain water.
- Lime, 1 wedge per serving, for garnish
- Crushed peanuts, as much as desired, for garnish

Dry Pho noodles, or rice sticks
***Picture from www.importfood.com.

The jar says fried red onion, but it's actually shallots. This is the brand I always use, but any brand should work.
***Picture from alibaba.com.

Steps:
- 1 Hour before cooking, soak the dry Pho noodles in hot (not boiling) water
- Heat oil in wok, crack in 1 egg and scramble briefly and transfer to plate
- Throw in the shrimps, cook quickly and transfer to plate along with eggs
- Cook shallots, salted/pickled radish, and tofu until fragrant
- Grab half of the noodles from the its soaking water and throw into wok, stir fry until soften
- Add bean sprouts, garlic chives, pour on Pad Thai sauce and stir fry until noodles are well coated
- Add the scrambled eggs and shrimps back into the wok, mix well and transfer to plate
- Serve hot with a wedge of lime and crushed peanuts.

Pad Thai made at home in the states with sauce made from scratch using the recipe above.


Pad Thai made here in Japan with Mae Ploy ready-made Pad Thai sauce.

Wednesday, October 27, 2010

Tom Yum Goong

One of my favorite Thai soups is the ubiquitous Tom Yum Goong and having ordered this soup at every single Thai restaurant I've been to (and they all tasted different too...), at one point I was determined to make it my darn self. Why? So I can have it just the way I want :P

Tom Yum Goong from Thai Avenue, Boulder, Colorado.

While researching online, I found this nifty online Thai grocer www.importfood.com. In addition to selling Thai fresh and/or packaged ingredients, ImportFood also posts Thai recipes and even videos of street vendors in Thailand cooking the dishes. Seriously, whomever came up with this website is one hell of an entrepreneur! Give people the recipes, then sell them the ingredients - what a great idea! I only bought from them once though (great service, by the way, and lightning fast shipping!), and they were the ingredients I couldn't find at my local groceries. But I do go back to the websites quite often for more recipes. I think the idea here is that if I keep going back often enough, I'll buy again. We'll see. I'm trying very hard to resist ^.^

Tom Yum Goong made at home in the states where more ingredients were readily available.

Anyway, among the various Thai recipes from ImportFood, I found this Tom Yum Goong recipeand started from there, tweaking just a tiny bit to my liking. It shouldn't taste any different from the ImportFood recipe though, since I do stick to the required key ingredients.

Here is what I use to make Tom Yum Goong, note that I'm not calling it "my" recipe, because it's not.

Ingredients:
- Shrimps, 3-4 medium per serving, peeled, deveined, and quickly dunk in boiling water or pre-cooked
- Onions, 1-2 medium, sliced thickly
- Straw mushrooms, 1 can (big or small can your choice, any brand will work), halved
***Picture from www.giantunion.com.
- Lemongrass, preferably fresh but dried is okay too. If fresh, use 1-2 3-inch stems sliced into 1-inch chunks and slightly crush each chunk with the end of the knife handle to release flavor. If dried, a few pinches of the dried stems. What I usually do is buy a bundle of fresh lemongrass discard 1-inch at the end as well as a couple outer layers depending on how dirty the lemongrass is. Then I wash the rest well, pat dry, cut them into 3-inch stems and freeze :) They freeze really well and will thaw in minutes if you run them quickly under warm water.
- Galangal, preferably fresh but dried is okay too. If fresh, use a stub half the size of your thumb. If dried, use 2-3 slices but soak in hot water first for several minutes to "reactivate."
- Kaffir lime leaves, 3-4 double leaves (6-8 single leaves), further break each single leaf in half. Again, fresh leaves are preferable but dried leaves works just as well.
- Lime, 1.5 - 2 whole fruits, juiced. This is probably the one ingredient that must be fresh, in my opinion. If lime isn't available, you can substitute lemon, but in my experience concentrated fruit juice will make the soup too harsh and tart.
- Cilantro (coriander), as much or as little as desired, rinsed and pat dry, for garnish.
- Optional: fresh chili pepper, crushed, if you want to give your soup some bite ^.^ I usually crush 5-6 peppers.
- Optional: tomatoes, 3-4 medium, quartered, then halved. This is completely optional, some people likes to add it, others don't. While Kim, the owner of Thai Avenue, said he has always eaten his Tom Yum Goong with tomatoes, however his chef said she added tomatoes only to give the soup some color. My hubby likes his Tom Yum Goong with tomatoes, but I actually think the sweetness in the tomatoes "blands" out the lime in the soup, so I never put tomatoes in. Unless hubby wants to learn how to make this for himself, he's going to have to make do without tomatoes in his Tom Yum Goong muahahaha... xD
- Optional: fried tofu, just because I love fried tofu ^.^
- Optional: there is a newer and creamy version of Tom Yum Goong, and you can make this version by adding 1 can of coconut milk (not juice, not puree, milk!). I use Chaokoh brand almost exclusively, but any brand will work. However, please note that adding coconut milk will make the soup a much heavier dish, so if you want to keep your soup light, don't make this creamy version.
***Picture from Amazon.com.

Seasonings:
- Nam prik pao (roasted chile in oil), 2 teaspoons
***Picture from www.importfood.com.
- Thai fish sauce, 5-6 Tablespoons
- Chicken broth, canned or powder, 3-4 cans, or 3-4 teaspoons/cubes dissolved in 2-3 quarts of water.

Steps:
- Bring chicken broth to a boil and add galangal and lemongrass, cook for 5 minutes
- Add prik pao and mushrooms, bring to boil again
- Reduce heat, add tomatoes if use, fresh crushed chile if use, kaffir lime leaves, and season with fish sauce
- Add onions, stir in lime juice
- Add shrimps last, just before serving as to not overcook shrimps.
- If you are making the creamy Tom Yum Koong, add the coconut milk right after the shrimps. Carefully stir the soup to dissolve the coconut milk.
- Serve hot and garnish with prigs of cilantro.

Tom Yum Goong made here in Japan with dried lemongrass, galangal, and kaffir lime leaves.

Monday, October 25, 2010

Bún Thang

Bún Thang is a northern Vietnamese rice noodles soup that calls for some very intricate (and long and tedious) preparations. According to this Vietnamese cooking blog, the dish was made famous by Mrs. Nguyễn Xiển (nee Nguyễn Thúy An, though some sources say Nguyễn Thị An) who whips it up from scratch to entertain her professor/party-official husband's colleagues. When asked why she calls it "Thang," she said her family tutor taught her that the Chinese character for the Vietnamese word "Thang" - 湯 (also pronounced "tang" in Mandarin and I would guess a similar sound in Cantonese also) - means "soup," and that in China, brothy dishes usually has this character 湯 added to indicate "soupiness." Yet among all the noodles soups in Vietnamese cuisine, none has this word "Thang" attached, and so Bún Thang it is, literally Rice Noodles Soup.

While this is a fun story, I'm not sure how accurate this account is as the blog vaguely quoted "internet research" as its information source with no actual source URL provided. Either way, "Bún Thang" is truly a unique name as there is indeed no other brothy dishes in Vietnamese cuisine with the word "Thang" in its name. I can't find much information on the dish in English, but here's a brief description on Vietnamese Wikipedia, and you can check out pictures from Google. Both my parents' sides of the family are originally from the North, so they've been making Bún Thang for at least a few generations. My mom gave me the shortened recipe because neither she or I have the patience or energy to "endure" the traditional recipe ^.^ But don't worry, while this easier recipe is not as complicated, the end result is still a delicious rice noodles soup. It's hubby's favorite noodles soup of all time alongside with Phở.

Here's the recipe for Bún Thang.

Ingredients:
- Rice vermicelli, 1 package.
These rice vermicelli are dried and translucent, fine angel hair-like rounded sticks in packages, the same kind they put in the non-fried Vietnamese spring rolls. At home I use exclusively Sinbo Brand, but any brand that says "Jiangxi Rice Vermicelli" will work and your local Asian grocery store should carry at least several different brands. Note that your package may say "rice sticks" or "rice noodles," and if the dried noodles inside are flat and not rounded, you may have gotten the dried Pho noodles instead and what you really need is the rounded rice vermicelli. It's confusing, I know.

Some of the packaging do look very similar, which only adds to the chaos. However, they all say Jiangxi Rice Vermicelli and the dried noodles inside are all fine and rounded. These are what they use to make the non-fried Vietnamese spring rolls they usually serve at any Vietnamese restaurants in the states.
***Picture from Wikipedia.

- Chicken thighs with drumsticks, 4-5 medium thighs, skinless but with bone.
- Eggs, 3-4
- Chả lụa, or Vietnamese ham/sausage, 1 stick. You can find this in the frozen section of the local Asian grocery store. They come in a rounded 6-inch burrito-like bundle wrapped in either aluminum or dark green banana leaf. Just make sure it says pork and not fish or chicken. Do not buy the "pork paste" in rounded white/translucent plastic containers as these are raw ham/sausage meant to be boiled or deep fried in dollops at home.

Vietnamese ham/sausage
***Picture from quangcaosanpham.com.

- Ginger, 1 stub, sliced into flat slices lengthwise.
- Lime, several slices, for garnish.
- Scallions, chopped, for garnish.
- Cilantro, several sprigs, for garnish.
- Lettuce, shredded, for garnish.
- Bean sprouts, leave whole, for garnish.
- Mint, shredded, for garnish.
- Thai basil, shredded, for garnish.
- Optional: fresh chile peppers, crushed, for garnish, if you want some spice.

If you want your Bún Thang to be truly authentic, I recommend finding the 2 extra garnishing ingredients below:
- Rau răm, or Vietnamese hot mint, shredded. This herb is an abundant in Southeast Asia but is pretty tricky to find in certain parts of the US of A. I couldn't find it in Jersey at all, searching through several Asian grocery stores. Mean while, there are plenty of it in Colorado where Vietnamese food is much more popular and widely eaten. If you live in Texas or California, congratulations, you've just hit the Vietnamese culinary jackpot and have no reasons (or excuses) to go without your Vietnamese hot mint!
***Picture from Vietnamese Wikipedia.

- Dầu cà cuống, or Southeast Asian giant water bug essence. Just dipping the tip of a toothpick into the essence and then stirring this tiny bit into your bowl is enough to give the soup broth a distinctively spicy and unforgettable fragrant aroma. I know you're thinking bug essence = eww + yuck + gross, but honestly speaking the essence of this insect is what truly makes this noodles soup unique. I would even go as far as to say that one cannot claim he's had authentic Northern Vietnamese Bún Thang until he's had it with the water bug essence. But of course, due to the high culinary demand in Southeast Asia, this bug has become super scarce and the vast majority of the essence sold on the Vietnamese market are mere imitation. The genuine stuff is almost impossible to find and when found would be ridiculously expensive. So see, you don't have to worry about having *real* bug essence in your Bún Thang - you probably won't be able to find it even if you're adventurous! My family has only 1 itty bitty little glass bottle the size of a sample perfume glass vial and my mom treasures it more than her pearls!

Seasonings:
- Salt, 1-1.5 teaspoons. You're making a huge stock pot!
- Sugar, 1 teaspoon.
- Black pepper, generous sprinkles.
- Vietnamese fish sauce, for garnish only. DO NOT season your broth with fish sauce or you will be very sorry!

Steps:
- Heat 1 Tablespoon of oil (I prefer olive) in a stock pot and brown the ginger slices. When the ginger is golden brown, turn off heat and remove pot onto a different eye, let cool.
- Mean while, mix the salt, sugar, and black pepper into a rub and rub it onto both sides of the chicken thighs. Carefully place the chicken thighs on top of the browned ginger slices, marinate for at least half an hour.
- Use this marinating time to prepare (rinse, dry, shred and/or) the scallions, cilantro, herbs, lettuce, and bean sprouts for garnish.
- Once done marinating, reheat the stock pot and fry both sides of the chicken thighs until golden. Remember to move the ginger slices to the top to avoid burning and add more oil if necessary to prevent the chicken sticking to the pot. If you like your broth a darker color (like me), then fry the chicken until golden brown.
- When the chicken thighs reach the desired color, fill the pot with water and cook the chicken thighs thoroughly, usually at least 1-2 hours (hey, I only said this is a shortened recipe, I didn't say it was quick!). Pay very close attention to the broth and skim all foams and excess fat gathering at the top to keep the broth clear and preventing it from turning murky. If the broth is too bland, season it with more salt to taste.
- While the soup is cooking, beat the eggs well with 1 teaspoon of fish sauce. Fry in thin layers on separate pan, then cut into thin strips.
- If you are using Chả lụa, or Vietnamese ham/sausage, use only half a stick and freeze the other half for later use. Slice the half into thin medallions and then further cut into thin strips.
- How do you know when the soup broth is ready? When the meat falls off the bone! Use a pair of cooking chopsticks to pick up the chicken thigh by the drumstick. If you can lift the entire thigh out of the soup intact, the soup's not yet ready. When the chicken thigh falls apart the moment you try to pick it up, the soup is done.
- When soup is done, reduce heat down to simmer, and fish the chicken thighs out of the broth carefully and set aside.
- In a separate pot, bring water to a boil and gently place the dry vermicelli noodles in. Boil for about 3-5 minutes, occasionally stir (be gentle!) to prevent the noodles sticking at the bottom of the pot.
- While the noodles are cooking, quickly debone the chicken. It should be super easy since the meat will fall right off without any effort on your part.
- To test when the vermicellis are done, pick up bunch with your chopstick, then let go slowly until only several strands are left in your [chopsticks'] grasps. Pinch a bit at the end and, well, eat it. If it's still firm or tough at the center, it's not ready. Vermicellis are done when they feels sticky to the touch and melt in your mouth. If you try to pick up a bunch and the vermicellis break, remove from heat at once - they're overcooked and will fall apart becoming mush if you don't strain and rinse with cold water immediately.
- To serve, first spread a handful of fresh bean sprouts at the bottom of the bowl, place the cooked rice vermicelli on top, then arrange the shredded herbs and lettuce, thin strips of fried eggs, Vietnamese ham/sausage, and pieces of chicken meat around the bowl.
- Ladle in the hot soup broth until vermicellis but not all ingredients at top are submerged. Then pinch in the chopped scallions and add a few sprigs of cilantro, squeeze in a slice of lime.
- Add the final touch of undiluted fish sauce, and crush a fresh chile pepper in if you want your noodles spicy.

I couldn't find any Vietnamese ham/sausage here in Japan, so I had to make do with imitation crab meat. I didn't really go with the dish, but better than nothing. And as you can see, I'm also missing a bunch of other herbs too. Oh well, it was still good ^.^

Popular Posts

Related posts

Related Posts with Thumbnails